making Koil Kutter jumprings
Six years ago I got interested enough in maille to cut my own rings, by hand with a jeweler’s saw. Beautiful flush-cut rings, but a bit hard sometimes on the fingers. And slo-o-o-o-w. So a couple of years later I splurged on a Koil Kutter. It’s a great tool, despite my low opinion of “cute” spellings. Like any power tool it is a little scary to start to use, but it is quite well designed, so that the speedy sawblade is sequestered in its little notch, and as long as you get it positioned so that it’s centered in the slot of the coil holder it’s pretty foolproof.
When mine was fairly new, I tried to take it along when visiting my brother in Boston, to show it off. Stupid me, not to remove the tiny little sawblade from its protective housing and pack it separately. The TSA was NOT amused, of course. They made me check it, and I almost lost my whole inventory thereby. But there was a happy ending. Hurray for the curious cat!
Others have described the use of this neat tool. For me, a few tricks that I worked out are useful, especially the taping of the coils, which I have not seen described elsewhere. So here is how I do it.

The tool on a Dremel rotates counterclockwise as you look at it from the business end. (I wish it were the other way, so when I use it for carving or sanding (right-handed) it didn’t tend to throw debris in my face, but that’s immaterial here.) The blade must be assembled so that when it turns counterclockwise, the steep sides of the teeth are leading and doing the cutting.
 You use the hexagonal allen wrench to put the blade on the blade holder. To put the blade holder on the Dremel, you have to have the little bitty wrench that came with the tool. Don’t lose it ;-) ! You can make do with needle-nose pliers, but I speak from experience here to say that’s not very satisfactory.
 You have to screw on the white housing (loosely), then insert the blade assembly into it and screw on to the tool. I tighten the blade up hand tight and then give just a tiny extra push with the wrench (the wrench is really needed only when to REMOVE the blade assembly.) Then I place the slotted top cover of the coil holder over the blade, in the recess formed by the cut-out in the PVC housing, and adjust the housing so that the blade can slide from one end to the other of the slotted cover and remain in the center of the slot. No further adjustment of the tool assembly is necessary until I have to take it apart to use the Dremel for something else. (I need another Dremel!)
 The coil of wire can be from 1/2 an inch long to almost four inches. There must be room, when the coil is clamped in its holder, up against the thicker stop at the left end, for the blade in its white housing to be fitted into the right end without being against the beginning of the coil. You seat the blade in the slot and then turn on the tool, and it has to be not against anything when turned on.
I wrap my coils in tape (masking tape or artist’s tape, usually) while they are still on the mandrel. I don’t want the new-cut rings going all over the place. Also, the assembly of the coil-holder depends on the structure of the coil to hold up the slotted cover. As the last rings are cut, if the coil all falls apart, the cover sinks down on the base, and the last rings tend to get messed up, and also to jump startlingly out of the holder. I worried about the effect of the tape stickum on the blade, but it doesn’t seem to be a problem. I try to tape the coils immediately before cutting, and to remove the tape immediately after.
 I put the taped coil in the holder and screw down the end screws LIGHTLY. I don’t want to make the cover bow upward in the center. I rub some Bur Life down into the slot for lubricant. I find Dawn liquid to be really messy, and it makes the tape come untuck. The cutter is placed in the slot at the beginning and held in place as it is turned on., and gently but firmly swiped to the left. Thin wire presents very little resistance -- if it seems to, the blade may be getting dull. 16-gauge rings have to be cut a good deal more slowly, as you are cutting twice the thickness of, say, 22-gauge rings.
 With repeat coils to do, time is saved by only loosening the right screw enough to shake out the taped coil, not taking it all the way off. Then I stick a short length of heavy wire through the coil, carefully remove the tape, twist the ends of the wire into a secure loop, and voila! two or three dozen rings, ready to tumble and use.
To cut coils smaller than 1/8” 22-gauge, you have to jury-rig some sort of spacer - a slotted bit of cardboard, or such, to hold the cutter assembly a little bit above the surface of the aluminum coil-holder cover. Otherwise you cut down through both layers of the coil and have a nice pile of wire crescents. I did this with a coil of sterling. Ouch! Over a dollar’s worth of wire. :( And with large coils, be very sure they are seated centered in the groove; with coils over 1/4” their curvature is so slight relative to the width of the groove that they can easily roll out of the correct position. I guess it would be nice if Kevin made an alternate base for really big coils, and a thicker cover for cutting micro-maille rings. Oh, well, it works pretty well.
The Koil Kutter in these photos was sold to me by Dave Arens in 2008, and still working just fine. The tool is now available from Kevin Potter.
When mine was fairly new, I tried to take it along when visiting my brother in Boston, to show it off. Stupid me, not to remove the tiny little sawblade from its protective housing and pack it separately. The TSA was NOT amused, of course. They made me check it, and I almost lost my whole inventory thereby. But there was a happy ending. Hurray for the curious cat!
Others have described the use of this neat tool. For me, a few tricks that I worked out are useful, especially the taping of the coils, which I have not seen described elsewhere. So here is how I do it.

The tool on a Dremel rotates counterclockwise as you look at it from the business end. (I wish it were the other way, so when I use it for carving or sanding (right-handed) it didn’t tend to throw debris in my face, but that’s immaterial here.) The blade must be assembled so that when it turns counterclockwise, the steep sides of the teeth are leading and doing the cutting.
 You use the hexagonal allen wrench to put the blade on the blade holder. To put the blade holder on the Dremel, you have to have the little bitty wrench that came with the tool. Don’t lose it ;-) ! You can make do with needle-nose pliers, but I speak from experience here to say that’s not very satisfactory.
 You have to screw on the white housing (loosely), then insert the blade assembly into it and screw on to the tool. I tighten the blade up hand tight and then give just a tiny extra push with the wrench (the wrench is really needed only when to REMOVE the blade assembly.) Then I place the slotted top cover of the coil holder over the blade, in the recess formed by the cut-out in the PVC housing, and adjust the housing so that the blade can slide from one end to the other of the slotted cover and remain in the center of the slot. No further adjustment of the tool assembly is necessary until I have to take it apart to use the Dremel for something else. (I need another Dremel!)
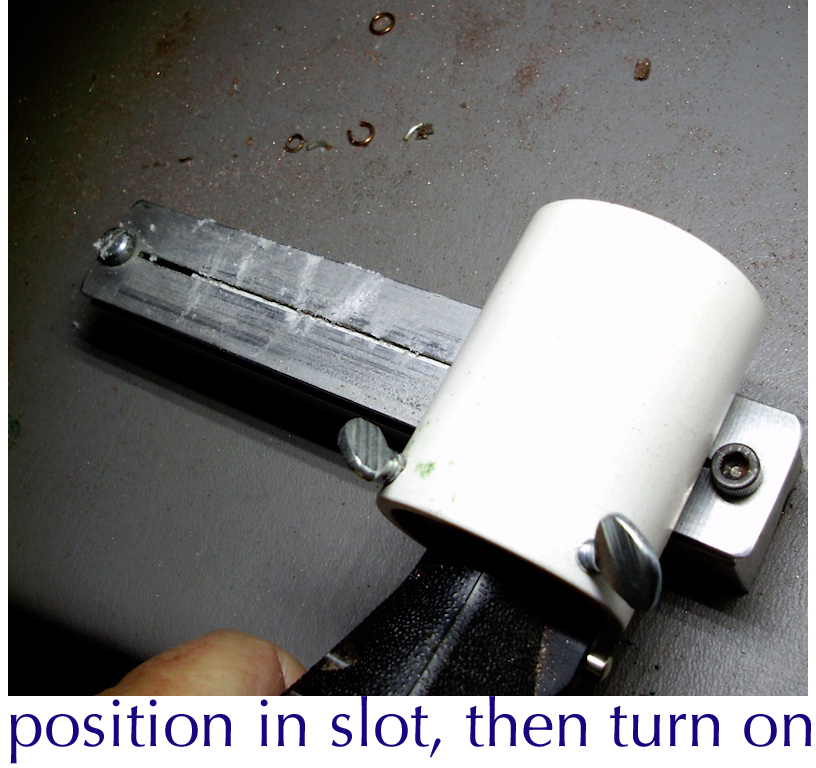 The coil of wire can be from 1/2 an inch long to almost four inches. There must be room, when the coil is clamped in its holder, up against the thicker stop at the left end, for the blade in its white housing to be fitted into the right end without being against the beginning of the coil. You seat the blade in the slot and then turn on the tool, and it has to be not against anything when turned on.
I wrap my coils in tape (masking tape or artist’s tape, usually) while they are still on the mandrel. I don’t want the new-cut rings going all over the place. Also, the assembly of the coil-holder depends on the structure of the coil to hold up the slotted cover. As the last rings are cut, if the coil all falls apart, the cover sinks down on the base, and the last rings tend to get messed up, and also to jump startlingly out of the holder. I worried about the effect of the tape stickum on the blade, but it doesn’t seem to be a problem. I try to tape the coils immediately before cutting, and to remove the tape immediately after.
 I put the taped coil in the holder and screw down the end screws LIGHTLY. I don’t want to make the cover bow upward in the center. I rub some Bur Life down into the slot for lubricant. I find Dawn liquid to be really messy, and it makes the tape come untuck. The cutter is placed in the slot at the beginning and held in place as it is turned on., and gently but firmly swiped to the left. Thin wire presents very little resistance -- if it seems to, the blade may be getting dull. 16-gauge rings have to be cut a good deal more slowly, as you are cutting twice the thickness of, say, 22-gauge rings.
 With repeat coils to do, time is saved by only loosening the right screw enough to shake out the taped coil, not taking it all the way off. Then I stick a short length of heavy wire through the coil, carefully remove the tape, twist the ends of the wire into a secure loop, and voila! two or three dozen rings, ready to tumble and use.
To cut coils smaller than 1/8” 22-gauge, you have to jury-rig some sort of spacer - a slotted bit of cardboard, or such, to hold the cutter assembly a little bit above the surface of the aluminum coil-holder cover. Otherwise you cut down through both layers of the coil and have a nice pile of wire crescents. I did this with a coil of sterling. Ouch! Over a dollar’s worth of wire. :( And with large coils, be very sure they are seated centered in the groove; with coils over 1/4” their curvature is so slight relative to the width of the groove that they can easily roll out of the correct position. I guess it would be nice if Kevin made an alternate base for really big coils, and a thicker cover for cutting micro-maille rings. Oh, well, it works pretty well.
The Koil Kutter in these photos was sold to me by Dave Arens in 2008, and still working just fine. The tool is now available from Kevin Potter.
Labels: jumprings, koil kutter
posted by AbigailM at 9:58 PM
1 comments
![]()